 |
| Source: http://www.icelab.eu/data/blg/images/php_apache_mysql.jpg |
Below are some instructions for installing Apache, MySQL, and PHP on UbuntuLinux. I stole them from this web site–HowToForge–just in case their site disappears, I’ll still have the notes. I’m grateful to them. Usually, I use XAMPP on UbuntuLinux but someone told me, “It’s so easy, you have to do it.” Ok, so I’m going through and following the directions.
- Install Apache web server – sudo apt-get install apache2
- Verify installation by going to http://localhost on your browser. If you get a message of “IT works” you’re doing fine.
- Install PHP – sudo apt-get install php5 libapache2-mod-php5
- Restart Apache web server so that it recognizes PHP – sudo /etc/init.d/apache2 restart
- Test your PHP
- sudo leafpad /var/www/testphp.php
- Type in the following line into the file that opens up – (note that below is a graphic…I couldn’t get blogger to display code):

- Save and close the file
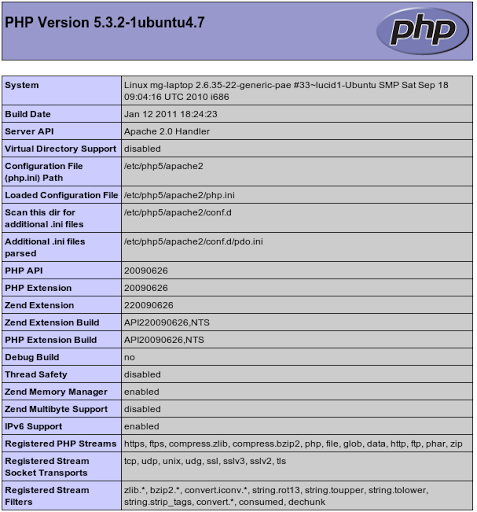
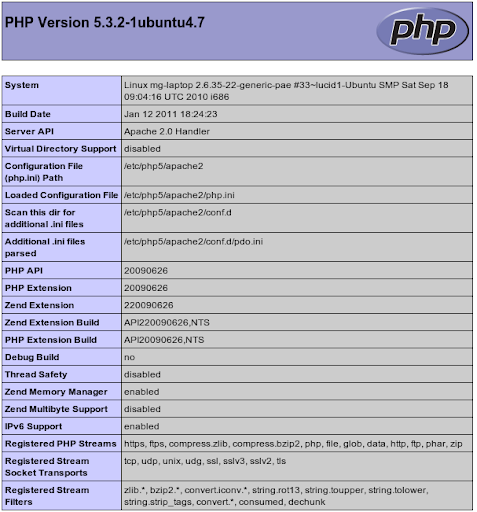
- In your web browser, type http://localhost/testphp.php
- If something like this shows up, you’re OK.
- Install MySQL database
- sudo apt-get install mysql-server
- You’ll be asked to enter the root user password. Don’t mess this up since it’s pretty important.
- sudo leafpad /etc/mysql/my.cnf
- Change the line reading “bind-address = 127.0.0.1″ to reflect your IP address. This presumes a static IP. (Note: I omitted this step without incident)
- Install phpMyAdmin, a tool to administer your MySQL databases. I love this tool and it’s well worth it. You can also use other tools like SQLYog, which runs on Linux under WINE.
- sudo apt-get install libapache2-mod-auth-mysql php5-mysql phpmyadmin
- Note that you may be asked to pick which server to administer with phpMyAdmin; choose Apache2.
- You may also be asked to have a database installed and configured…”Configure database for phpmyadmin with dbconfig-common? ” Select YES as the response.
- You will be asked for the password of the database’s administrative user. That’s your root password that you typed in earlier.
- You will also be asked to setup a phpmyadmin password…type in a good password.
- sudo leafpad /etc/php5/apache2/php.ini
- Restart the server with this command – sudo /etc/init.d/apache2 restart
- You can find where to put web folders (e.g. Moodle install folder) at /var/www
- You can get to that folder by typing cd /var/www and then you can get to work!
- You’ll have to adjust the permissions on any folders you make, such as using a command like sudo chmod 777 -R training assuming that training is the folder for a Moodle. After that you can copy contents into that folder as a regular user. If on a production server, you may want to adjust those permissions from 777 to something else (suggestions?).
I’ve omitted a few steps that weren’t relevant or unnecessary. The install worked great!
- Copied the contents of the Moodle zip file (unzipped it first, of course) into the training directory
- In the /var folder, I created a folder entitled with the command sudo mkdir moodledata
- I used the sudo chmod 777 -R moodledata to change it so it was “write-able” (that is, data could be saved to it.
- I changed into that folder by typing cd moodledata and then made another folder, mkdir training_data to house the moodledata (e.g. documents, files) for the Training moodle I’d created.
- Went to http://localhost/training and voila, up popped the Moodle for installation.
Updated to include Moodle 2.0 Install on 04/23/2011:
To install Moodle 2.0.x, I had to take the following added steps:
- sudo apt-get install php5-xmlrpc
- sudo aptitude install php5-curl
- sudo apt-get install php5-intl
The benefit of doing that is that instead of a server check that fails, you see something like the following:
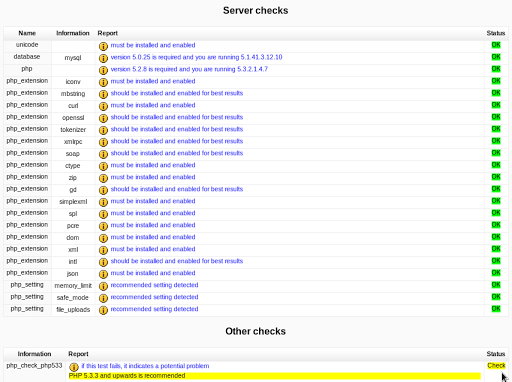
And, you’re able to move on!
Some reminders:
To restart your server, type:
sudo /etc/init.d/apache2 restart
To stop your server, type:
sudo /etc/init.d/apache2 stop
To start your server for the first time, type:
sudo /etc/init.d/apache2 start

Enter your email address:
Delivered by FeedBurner

Discover more from Another Think Coming
Subscribe to get the latest posts sent to your email.

sudo tasksel install lamp-server;)
sudo tasksel install lamp-server;)