Guess what? New release of Peppermint Two this week. Basically, its the best features of One and Ice….. or better yet – Ice on steroids 🙂
If you’d like an early review copy let me know and I’ll get you the link to download it. Only stipulation is that you don’t share the download link until the release date.
Let me know and you’ll have a 3-4 day jump on everyone

Although you can use UNETBOOTIN to create your own bootable USB flash drive, if you want to be able to install software on that USB flash drive and have it available AFTER rebooting, you will want to use a tool called the Universal USB Installer from PenDriveLinux.
Step 1 – Creating a Bootable USB Flash Drive
- Download USB Universal Installer and save it on your Desktop (on Windows XP/7)
- Download the Peppermint Two ISO.
- Run the USB Universal Installer and set the options to include a persistent drive. If you’re using a 8gig or 16gig flash drive (recommended), set your persistence file (“casper-rw”) to be 4 gigs or the max allowable. If using a smaller drive, set it lower.
- Start the process and wait about 5 minutes until it is complete.
- Reboot your computer and press the function key (F12 on Dells usually) so you can tell the computer to start from USB device.
- Go to PREFERENCES and install Hardware/Video drivers for your wireless and/or video card. Type in sudo apt-get install nvidia-common to ensure you get drivers for your nVidia graphics card (if you have one installed…if you don’t, you can skip that). Or, you can do this to get proprietary (not open source) wireless drivers. It’s usually a good idea to have a “wired” connection during this process so that you’re not stuck without connectivity. Once you get the wireless going, then you can “unplug.”
Once you’ve restarted off your USB flash drive and loaded proprietary drivers, you’ll need to get it loaded with all the great software you’ll need. I used these directions intended for Ubuntu 11.04 Natty Narwhal. This allowed me to install a whole bunch of my favorite software.
Import the medibuntu key:
- Right click on this link and save it to your computer
http://packages.medibuntu.org/medibuntu-key.gpg - Go to Peppermint Menu, click on it, then go to SYSTEM TOOLS->SOFTWARE SOURCES and then click on the AUTHENTICATION tab, then click on IMPORT KEY button and find the medibuntu key.
You’re ready to move onto the next step.
Step 3 – Install Favorite Software
a) sudo add-apt-repository “deb http://archive.canonical.com/ natty partner”
b) sudo apt-get update
QUICK ASIDE
For a “lite” USB flash drive for troubleshooting a Windows machine, I recommend the following software:c) sudo apt-get install gparted gpart filezilla clamtk p7zip xfe guake
Planning to use this machine to “disinfect” Windows from a virus installation? You have several choices:
- AVG Antivirus for Linux
– Get the DEB version, save it to your computer then double-click on it. Double-click the DEB file that is downloaded and you’ll be able to install it (after entering your computer’s password).
- Avast for Linux
– Get the DEB version, and double-click to install it.
You can also consider using the following instead – Ultimate Boot CD
- sudo apt-get install vlc gparted gpart filezilla keepassx libgoo-canvas-perl shutter shotwell clamtk p7zip emelfm2 guake ghostscript pdftk pdfchain gpa seahorse
- LibreOffice (this is a full-featured free Office suite compatible with MS Office).
Step 5 – Setup Autologin
(adapted from Asheguy’s instruction here)
1. To setup your Peppermint Two to auto-login, avigate to /etc/xdg/peppermint/lxdm and open the configuration file there, lxdm.conf.
2. Uncomment (delete the # sign and preceding space) in front of the lines for “autologin” and “session”, then change the username dgod to whatever your username is.
That said, Peppermint Two is running great…for those who care, here’s htop stats:

Step 6 – Adjusting the Time/Date Settings
Since I’m not much up to date on military time(22:06 instead of 10:06 PM), I wanted to change that, too. Fortunately, when I read the instructions (indicated by “Format codes:” in the dialog box below, which you have to type man 3 etc into your Terminal), the following modification made the change: %a %d-%b-%Y %I:%M %p
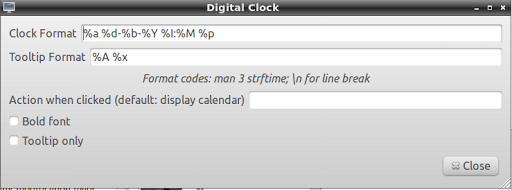
This yielded the time format I wanted:

Step 7 – Add Printing
- To enable printing–read the backstory here–for printers you connect directly to your computer, you will need to take two steps…once they are done, you should be able to plug in your printer and it will be detected!
- sudo apt-get install hplip cups system-config-printer-gnome
- Create a script:
sudo gedit /etc/network/if-up.d/cups
Then, paste in this code:
#!/bin/sh
service cups restart
Then make that script executable:
sudo chmod +x /etc/network/if-up.d/cups
Then restart your computer. - Run the following configuration:
sudo hp-setup -i
While you might think it can take a long time to get a machine going, it’s really pretty quick. In less than 40 minutes, you’re up and going. That’s a LOT less than other machines that seem to take forever to download security updates, etc.

Enter your email address:
Delivered by FeedBurner

Discover more from Another Think Coming
Subscribe to get the latest posts sent to your email.
