
There’s nothing like finding a quick solution to a time-sensitive problem. I have to admit that I’ve created a “Technical” folder to house all my technical chats with Gen AI. Having tried to do many of these solutions by searching Google, using Gen AI to come up with tailored solutions has been a BIG, HUGE time-saver.
Today’s solution combines several tools I have relied on but never thought to put together–Whisper Desktop and FFMPEG. I am braver about “delving” (haha) into the command line since I have Gen AI to assist me.
Complete Tutorial
FFmpeg (Install → PATH → Command Line) + Whisper Desktop for Captions (Install → Use → Export SRT)
This is a full workflow:
- Install FFmpeg
- Add FFmpeg to PATH
- Install Whisper Desktop
- Generate SRT captions
- Burn captions into your video using FFmpeg
PART 1 — Install FFmpeg
1. Download FFmpeg
FFmpeg is a command-line tool for working with audio/video.
Download from a safe Windows build provider:
https://www.gyan.dev/ffmpeg/builds/
Select: ffmpeg-essentials.zip
(or ffmpeg-full.zip if you want more codecs/tools)
Save it to your Desktop or Downloads.
2. Extract FFmpeg
Unzip the downloaded ZIP.
Move the extracted folder to a permanent location, for example:
C:\Tools\ffmpeg\
Confirm this file exists afterward:
C:\Tools\ffmpeg\bin\ffmpeg.exe
That bin folder is what Windows must know about.
3. Add FFmpeg to the System PATH
Why this matters
PATH tells Windows where to look for programs when you type a command.
Adding FFmpeg to PATH means you can run ffmpeg from any folder.
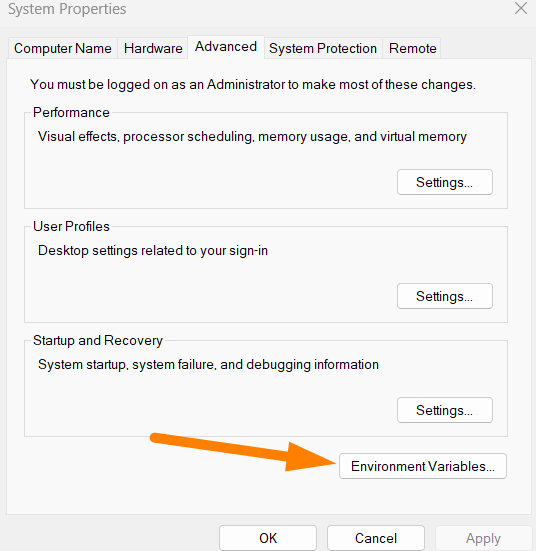
Steps
- Press Windows key, type:
Edit the system environment variables - Open it → click Environment Variables.
- Under User variables for , find Path → Edit.
- Click New and add:
C:\Tools\ffmpeg\bin
(No quotation marks.)

- Click OK on all windows to save changes.
4. Verify FFmpeg
Open Command Prompt or PowerShell:
ffmpeg -version
You should see version info. If not, recheck the PATH entry.
PART 2 — Install Whisper Desktop (for automatic SRT captions)
Whisper Desktop is a free, offline speech-to-text app based on OpenAI Whisper.
It converts audio or video into text, subtitles (SRT), or VTT files.
This is the simplest Windows installation method.
5. Download Whisper Desktop for Windows
Reliable Windows builds are available here:
https://github.com/Const-me/Whisper/releases
Download the latest file named:
Whisper-<version>-win-x64.zip
Example:
Whisper-1.3.0-win-x64.zip
6. Install Whisper Desktop
- Extract the ZIP file.
- Move the extracted folder to a permanent place, e.g.:
C:\Tools\Whisper\
- Open the folder and double-click:
Whisper.exe
Whisper Desktop will launch without needing installation.
PART 3 — Generate SRT Captions using Whisper Desktop
7. Load your audio/video file
Inside Whisper:
- Click Browse
- Select your video file (e.g.,
Santa2025.mp4)
Whisper will automatically load it.
8. Select transcription model
Whisper Desktop shows model choices:
- Tiny / Base – fastest, lowest accuracy
- Small – good balance
- Medium – slower, more accurate
- Large-v3 – most accurate, slowest
Choose Medium or Large-v3 for best subtitle quality.
9. Choose output format
Set Output Format:
SubRip (.srt)
This produces a standard SRT subtitle file compatible with FFmpeg.

10. Start transcription
Click Transcribe.
Whisper begins generating text + timestamps.
Processing time depends on CPU/GPU and file length.
11. Save the SRT file
When transcription finishes:
Click Save As → choose a location, e.g.:
C:\Videos\Santa2025.srt
This file contains your timed captions.
PART 4 — Burn or Attach Subtitles using FFmpeg
Now that you have your SRT file from Whisper, choose one of two methods.
METHOD A — Burn subtitles into the video (permanent, “hard subs”)
Command:
ffmpeg -i Santa2025.mp4 -vf subtitles=Santa2025.srt -c:a copy Santa2025_hardsub.mp4
What’s happening:
-vf subtitles=overlays captions directly into the frames-c:a copykeeps audio unchanged- Output has baked-in text

METHOD B — Add SRT as a selectable subtitle track (soft subs)
Command:
ffmpeg -i Santa2025.mp4 -i Santa2025.srt -c copy -c:s mov_text Santa2025_softsub.mp4
What’s happening:
- The SRT is added as a separate track inside the MP4
mov_textconverts SRT to MP4’s internal subtitle format- Viewer can toggle captions on/off
PART 5 — Verify Output
Example checks:
Hard-sub file
Play the video—text should always be visible.
Soft-sub file
Open in VLC → Subtitle → Subtitle Track → select your track.
Summary
You now have a complete workflow:
- Download FFmpeg
- Extract it and add
binto PATH - Verify with
ffmpeg -version - Install Whisper Desktop
- Use Whisper to generate
.srtcaptions - Combine captions + video with FFmpeg
- Produce either burned-in or optional subtitles
Discover more from Another Think Coming
Subscribe to get the latest posts sent to your email.
