Problem – While working with middle school teachers about to embark on a bold journey, it became advantageous to take photos of the students. The photos would end up as the thumbnail image that appears when someone posts a message in the forum, or simply, the students’ profile. There were several ways to approach the problem, but each proved too long and complicated for an introductory 3 hour session taking place 2 days away.
Solution – I set out to find an easy way to incorporate photos…an easy way to upload the photos to Moodle, an easy way to work with them so that it would be easy for the students to use. There appear to be two possible solutions. I’d heard of Gallery2, a great way of sharing images online with folks, and that it had been included as a module for Moodle. However, as I recall, Gallery2 has many wonderful features…perhaps too many?
As a result, and because I wanted to try something different, I downloaded Lightbox Gallery Resource, a module for Moodle 1.9+. Installation was a snap…simply uploading the uncompressed file into the MOD folder on Moodle then going to the http://moodleinstall/admin folder get it going. Here’s the instructions from the install file:
To install this plugin, upload the lightboxgallery folder and it’s contents into your /mod folder in your Moodle install. After uploading, login as admin and visit your Admin/Notifications page (you’ll find this page at http://yoursite.com/moodle/admin/index.php), which will setup the required database tables and complete the installation.
After installation you’ll find an extra item on your resources menu when editing a page. In an English install of Moodle it will be named ‘Add a lightbox gallery’, this could differ for other languages.
Once installed, it appears as part of the drop-down, as shown below:
And when you choose that, this appears: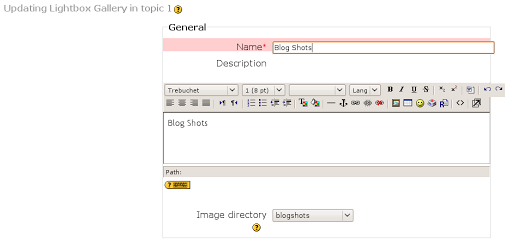
For fun, I called the image directory “Blog Shots” and then chose it as the image directory. To make the directory, I first created the directory on the server using the Moodle Link to a File or Web Page resource…created the directory then backed out of the Link to a File. There may have been a more elegant way to create the directory but I did not know it.
If you look at the file, you can add images…

When you click on add images, you’ll see the traditional browse and upload window, as shown below…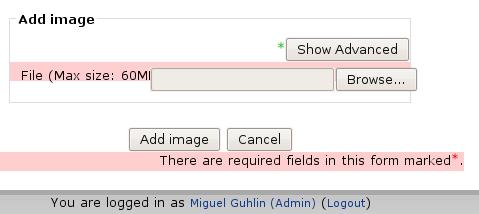
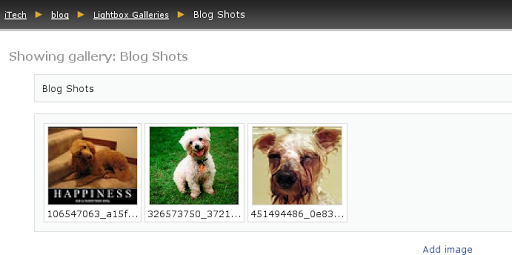
If you click on the SHOW ADVANCED button above, you’ll be able to add a Caption to your picture. Here’s what it looks like after adding one image:
When you’re done, it looks like this:
Want to get rid of it? Click on your standard Moodle “TURN EDITING ON” and you’ll see a pop-up menu appear with each image:
Pretty darn amazing and easy. Thank goodness.
BTW, I forgot to mention that I also copied this file based on this blog entry into the js folder…apparently, it adds some functionality I haven’t discovered.
Finally, check out the Moodle Tip Roundup, Moodle Habitudes, and Moodle Mambo!
 Subscribe to Around the Corner-MGuhlin.org
Be sure to visit the ShareMore! Wiki.
Everything posted on Miguel Guhlin’s blogs/wikis are his personal opinion and do not necessarily represent the views of his employer(s) or its clients. Read Full Disclosure
Discover more from Another Think Coming
Subscribe to get the latest posts sent to your email.

you’re the best, Miguel! Wow, exactly what we were looking for. We installed Gallery 2 and tied it into moodle, but at the end of the day just found it to be quite clunky.This is FANTASTIC. A nice and light photo sharing tool for moodle. Good, stuff.Thanks for constantly sharing…you’re a great model for all of us. Cheers!Matt
you’re the best, Miguel! Wow, exactly what we were looking for. We installed Gallery 2 and tied it into moodle, but at the end of the day just found it to be quite clunky.This is FANTASTIC. A nice and light photo sharing tool for moodle. Good, stuff.Thanks for constantly sharing…you’re a great model for all of us. Cheers!Matt
@Matt – Glad it was helpful. Your situation is the same as we’ve encountered, so I’m grateful to the Moodle community for coming up with a better solution (e.g. Lightbox) than the clunky Gallery2 integration.Don’t get me wrong, Gallery2 works great standalone!Miguel
@Matt – Glad it was helpful. Your situation is the same as we’ve encountered, so I’m grateful to the Moodle community for coming up with a better solution (e.g. Lightbox) than the clunky Gallery2 integration.Don’t get me wrong, Gallery2 works great standalone!Miguel
I would like to know how to allow students to add images; the "add image" link only shows up when I am logged as an administrator.Thanks ! Antonio
I would like to know how to allow students to add images; the “add image” link only shows up when I am logged as an administrator.Thanks ! Antonio
Students can Post images by assigning these rights to them for the specific gallery.1. Go to the Lightbox Gallery2. Click Edit this Gallery3. Select Tab: Override permissions4. Click Student5. Select "Allow" for "Add image to lightbox gallery"6. Save changes.Your students can all now contribute photos.
Students can Post images by assigning these rights to them for the specific gallery.1. Go to the Lightbox Gallery2. Click Edit this Gallery3. Select Tab: Override permissions4. Click Student5. Select “Allow” for “Add image to lightbox gallery”6. Save changes.Your students can all now contribute photos.